This week I’m trying to process/read interrupts. This is not setting an interrupt table, but rather understanding how I can insert interrupts into the ARM CPU.
This will be useful in adding timers and other external input to the CPU.
Initial Research: No VGIC
Initial research led me to the KVM documentation, asking me to create a VGIC. It promised to solve my problems and I would be able to raise interrupts through that. Then well.
The RPI does not have a VGIC, which the KVM API requires to set up the device. In fact, trying to query for the feature KVM_CAP_IRQCHIP, shows that this device doesn’t have it.
Bummer. 🙁
The Saviour: KVM_IRQ_LINE
After rummaging through documentation, I see this line in the KVM API, for the KVM_IRQ_LINE api:
KVM_IRQ_LINE can always be used for a userspace interrupt controller.
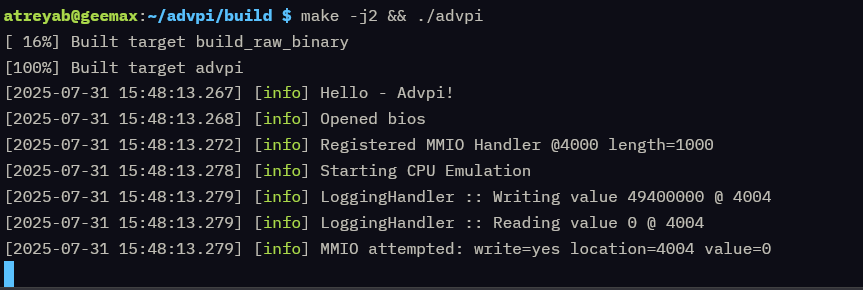
So, I whipped up a tiny program that would write to a memory location, then sleep till an interrupt.
The program has a no-op sled just because I don’t remember the exact PC target location I should achieve. I know its standard in malicious software, but this works good enough.
tl;dr – This program will make the vm execution pause until any interrupt, then will resume. I’m assuming some implementations use a NOOP, but this is worth a try.
After the write to the MMIO location 0x4004, which I’ve designated for logging right now, it pauses. Awesome!
Raising an interrupt
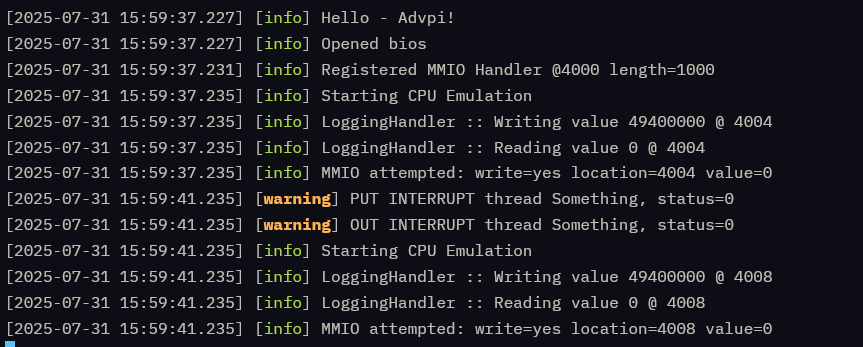
So, to raise an interrupt, I cooked up a dirty piece of code – a thread that raises an interrupt after 4 seconds, then switches it off immediately.
std::thread t1([&](){
        sleep(4);
        struct kvm_irq_level level = {
            .irq = 0b0001,
            .level=1
        };
        int res = ioctl(this->vmFd,KVM_IRQ_LINE,&level);

        spdlog::warn("PUT INTERRUPT thread, status={}",res);

        //turn it off
        level.level = 0;
        res = ioctl(this->vmFd,KVM_IRQ_LINE,&level);
        spdlog::warn("OUT INTERRUPT thread, status={}",res);
    });
With this, I get the same as before, but –
We get one more round of execution! And it reads the next memory element 0x4008!
Conclusion
Small bit of work, but that’s mostly because of other work at hand and that such things often require deep dives.
The next steps will be to have some form of response from the CPU to the interrupt. Some form of ISRs would be nice to verify how these are working.
Since I joined uni in London, I’ve fell sick a few times. I have this habit of logging my temperature (something from my family) so its easy to report to a GP, and easy to remember when you last had medicine.
I have been using Google Keep as this scrongled way of logging my temperature, but that seems a bit inconvenient; So I look around Google Play Store — and nothing much (in 2019).
Then I remember this isn’t my first rodeo with fevers, and I had been working on vitals-recorder to log temperatures.
It was incomplete, with quite unusable issues, so I went on to complete it. Atleast the smallest bit of it. Try it out maybe!
What’s the thing?
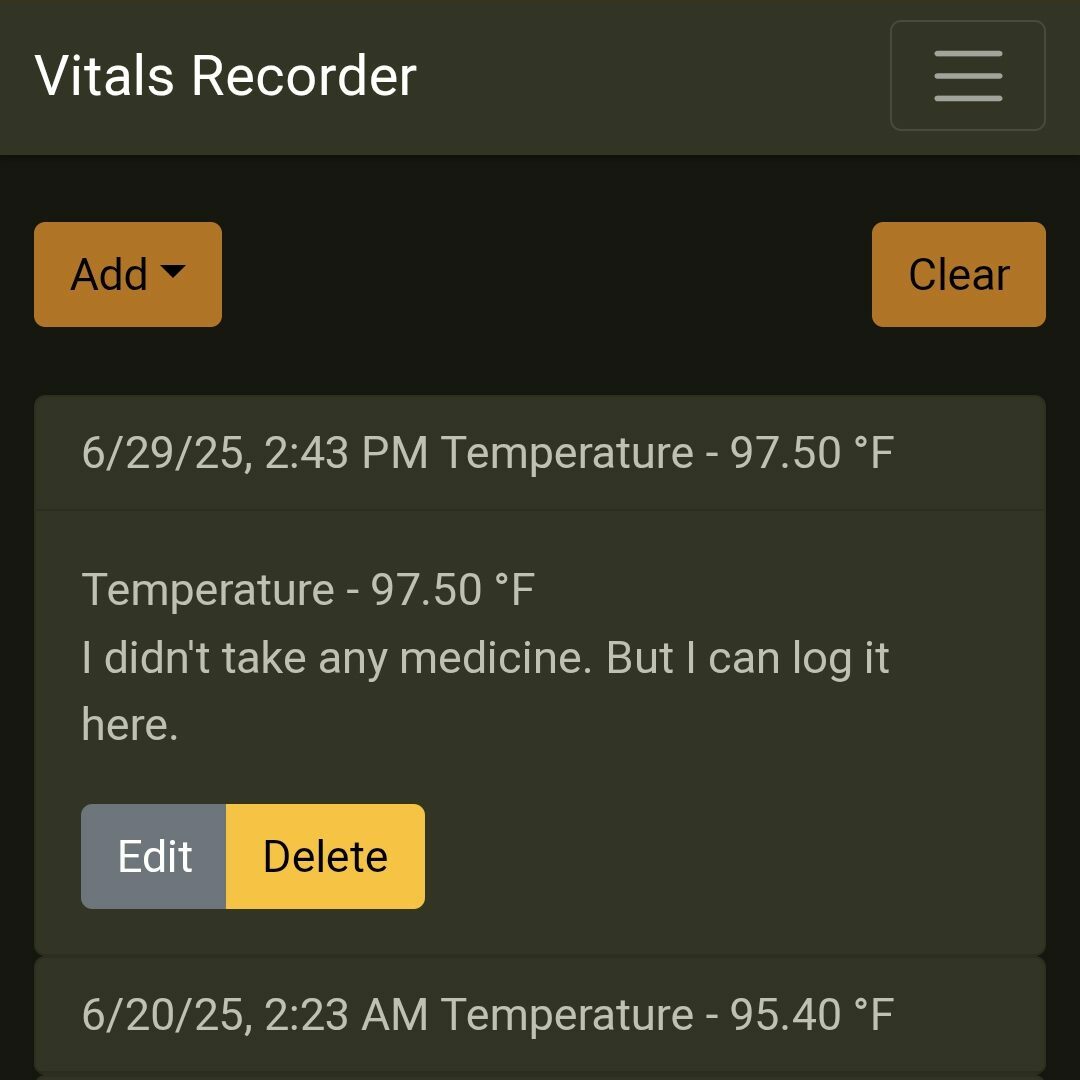
Well, its to track your temperature, as and when you need. It can also log BP, sugar levels, SPO2 (in case you have that kind of fever) and a small description. I usually just log any pills I’ve taken at that time.
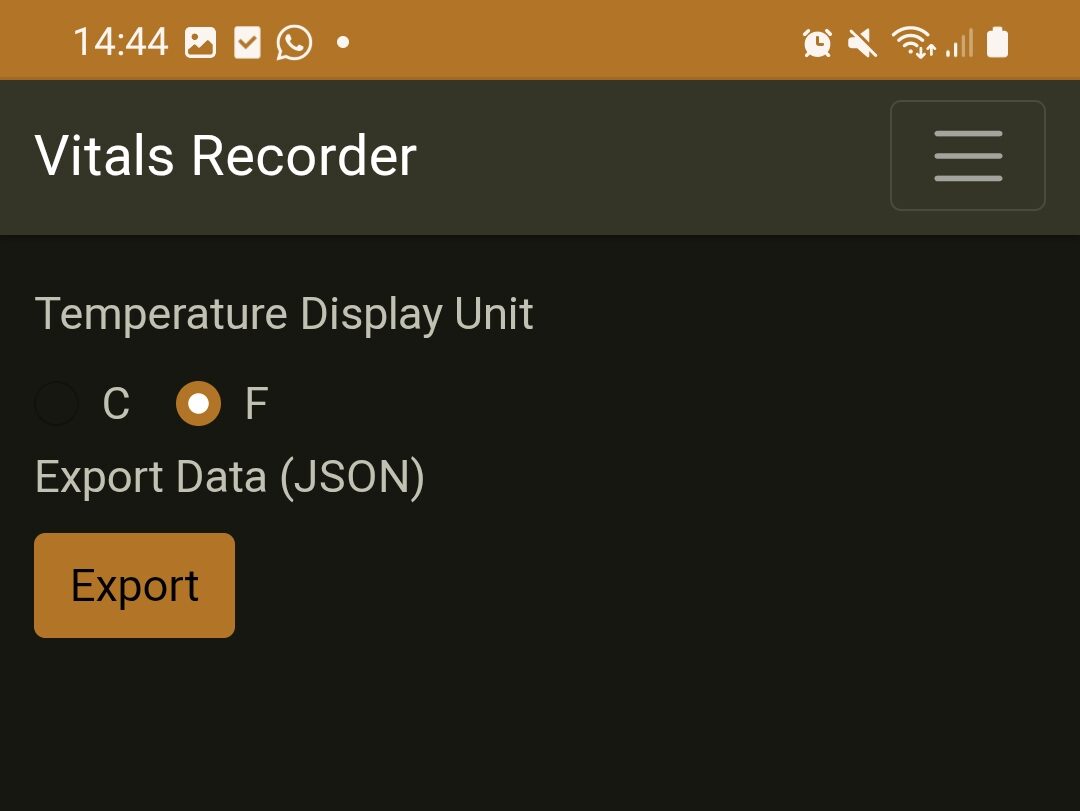
Very simple to add and edit. Plus, if you don’t like Fahrenheit, you can seamlessly use Celcius instead.
As visible, you can also export this data out as JSON, if you decide you want to use something else. The format is not too complicated to wrangle, and its documented here – Items.ts. The JSON is an array of items.
Completely offline
Well, the best part is this “app” is that its a PWA. This means it will work offline from the time you first open the website, and you can “install” it on your phone/desktop and it will function similar to a “native” application.
Not the best name but hey it works.
The data’s all stored locally (IndexedDB) and never leaves your device. In fact, since its completely local, there’s no server side processing and its hosted completely on Github Pages.
Summing it up
Well, here’s a nifty tool in case you want to log any vitals. Feedback is always great to have, so do try it out and let me know!
After a(nother) long break, I have decided to work in small features. This week was mostly adding MMIO handlers, ARM test code compiling and changing out logging.
MMIO
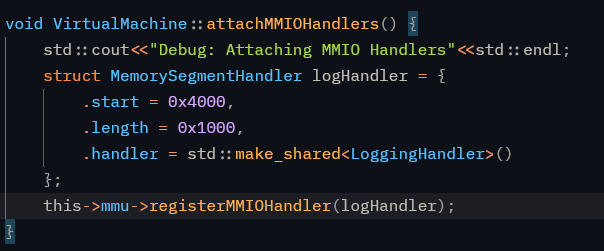
Well, it was already there, but I didn’t have any easy way of using it. I added a modular system to register and track MMIO request handlers, and then each handler, can implement its own logic for handling any MMIO request!
So what does this mean?
We can now delegate parts of MMIO to other bits of code to make this happen.
Code building
Getting tired of writing in ones and zeros (what a long forgotten issue) — I turned to assembling code.
A quirk of the process is that I need raw code, as a binary blob, and not the ELF binary that as (the GNU Assembler) provides.
This led me to a well-accepted solution from the interwebs:
as one.S -o one.intermediate.bin
objcopy -O binary one.intermediate.bin one.bin
But then, I saw this wonderful issue: where I realised that the as installed in my RPi was for ARM8, and for 64 bits. The easiest way to turn to 32-bit compilation was (arguably not easier, but less of a headache) to install the gcc-arm-none-eabi package, and use its as.
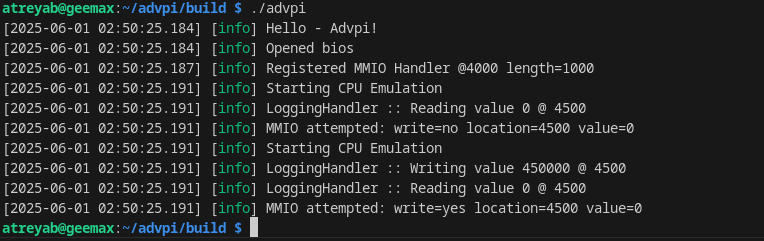
So with that out of the way, we can quickly create up an example program, and get:
I’m not sure how to get a HALT or equivalent out of the machine, but I get these wonderful logs if I run the machine twice (two exits from MMIO; one for the ldr and one for the str):
Yay! MMIO works, and the logging handler receives it.
Logging
As evident above, working with logs is getting a bit tedious, especially from using cout and printf, so I linked up this wonderful library spdlog to handle the logging.
So with this, I can tweak the log levels to see the data I want, and more importantly, the logging api to define them is much cleaner.
Summary
There’s a lot more things to do, but I will probably have to read more to understand which section can be tackled next. It might be a good idea to have a look at the Timers and Interrupts before going onto other topics.
As a way to keep myself in track, I’ll create logs as I’m working on things. That way, I can be more regular with work. Anyways, this week will be getting a GUI.
GUI – getting a screen.
Well, here’s the plan. I’ll have to create the PPU (The GBA’s equivalent of a GPU and the CPU timers), so I can get an output. For that, I need a window.
SDL2 to the rescue. I’ve only used SDL2 in Rust (ref: porcel8).
Seems it was pretty easy to get it integrated after installing the SDL libraries.
find_package(SDL2 REQUIRED CONFIG REQUIRED COMPONENTS SDL2)

// link the library to our executable
target_link_libraries(advpi PRIVATE SDL2::SDL2)
And it builds successfully!
The screen
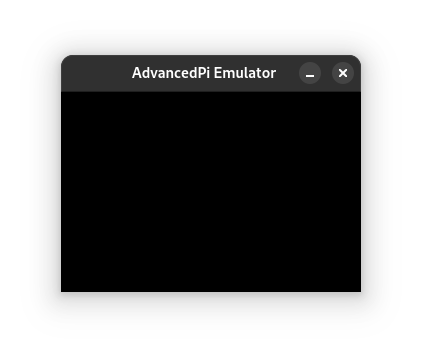
With some X11 forwarding, and adding some code to create a screen on output, we get an output!
Of course, for those of us using Fedora, which uses Wayland, XWayland needs to be enabled, and then on the , X11 forwarding needs to be enabled.
# Set this in /etc/ssh/sshd_config
X11Forwarding yes
Once that’s enabled, its just ssh-ing into the system, and then seeing a wonderful screen
ssh -X geemax # geemax is my test Pi
And, window!
Short end of a week
That’s it for now, I’m afraid.
In retrospect, working with the PI is a bit annoying and I’d like a totally local setup, and also decide between working on the PPU or the timers, whichever gets me to the boot splash screen faster!
Emulators have always felt fascinating to me, and while trying to find ways to learn about them, I chanced upon BytePusher – an esolang by Javamannen. Let’s talk a bit about the Bytepusher emulator I built.
What’s Bytepusher?
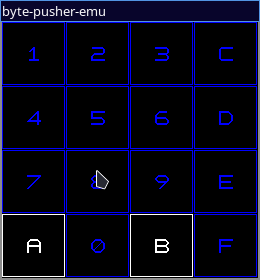
tl;dr – Bytepusher is a specification for a single instruction set computer with a limited input, 2D graphics and audio.
It has one instruction, and runs like a champ.
Emulator firsts
Well, its a virtual machine to be honest, but I assume there’s enough in the specification to make it a complete phyiscal machine.
This was one of my first works in Rust, and it has a single thread system that processes the instruction, then goes to render the graphics and audio.
One of the trickier things is that the audio queue should be as small as possible, but yet can’t be empty. If empty, you have stutters, or otherwise, you have high latency. For now, I synchronise with the audio queue to maintain an expected speed of execution.
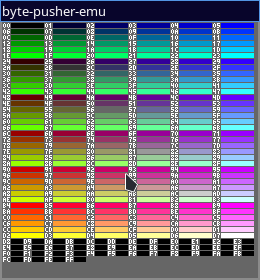
What does it look like?
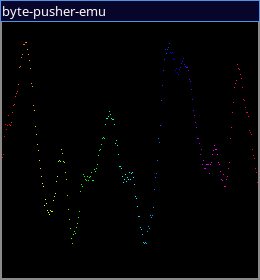
We get audio, input output and graphics!
Check out the work here! I apologise but I only have linux builds available, executables from the other platform can be built from source.
This week was hyper-focused on getting normal, proper code execution.
Code layout
The first thing to get right was the code execution.
I found this wonderful project kvm-arm32-on-arm64 that provided a style for doing this.
So, it turns out that ARM converter prints the code in the format its in memory. So, to write it correct, I used the big endian format and then stored it in code in the uint32_t format. This way, the compiler will set it to little endian format as required, and I don’t need to think about endianness for a while.
I would expect it to exit from MMIO (as it attempts to write to a read only page) at 0x1000, and exit per the program. If it loops or does anything else, something is wrong.
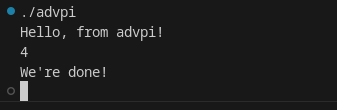
Thankfully, we get this wonderful(ly confusing) output:
Hello, from advpi!
Opened bios
Attempted mmio
Attempted write=yes of value=4097 and at address=4096
Register(0)=0
Register(1)=0
Register(2)=0
Register(3)=0
Register(4)=0
Register(5)=0
Register(6)=0
Register(7)=0
Register(8)=0
Register(9)=0
Register(10)=0
Register(11)=0
Register(12)=0
Register(13)=0
Register(14)=0
Register(15)=0
Closing the Virtual Machine
So, the MMIO output was correct, but we’re not able to see the registers. I’m thinking it is more related to the exception levels and register banks that are available, but I shall check more on it as required.
So although technically we can’t see the registers, we can get some rudimentary output through MMIO, or shared memory.
If I remove the MMIO causing statement, we get an endless loop – showing that we’re stopping as required.
What’s next
This week was short as well. Following this, I’ll be setting up a GBA cart, and the video device. I’m thinking of using SDL2 to show a video device and handle device I/O.
This week was a non-amusing transfer from C to C++ and adding the GBA BIOS.
BIOS Map
The Nintendo BIOS contains the basic code needed to initalize and use the GBA. After that the BIOS hands over control to the game that’s plugged in. My initial thought was to load the file into the game, then I remembered the golden word which haunted me last week – mmap. It was used to create the memory which is mapped to the guest VM.
So, I mmap-ed the BIOS file into the memory, then added it in.
Now its upto the kernel to manage it, and not my headache (for now).
Then I tried mapping the BIOS into the memory of the VM, and it segfaulted instantly. I changed some of the parameters to allow writes, and then it didn’t segfault, but the mmap didn’t go through.
After looking into the documentation, here’s the mistake I was mapping.
I was setting the slot to 0 for both the onboard memory (or where I was putting my code), and the BIOS page. They are actually different slots of memory, and need to be initialized as separate slots.
C++
I’m not used to C (and KVM and any of this) and it shows, so its probably a good idea to shift to C++ while I still can.
I wanted exceptions to handle unexpected failures, but I also didn’t want to model for releasing resources – a job better left for the compiler. C++ seems to be a better idea. I removed all the GOTOs, and got around to C++, then finally put an exception that helped me with my sanity.
class InitializationError : public std::exception {
    private:
    std::string message;
    public:
    InitializationError(std::string);
};
Being able to use exceptions along with constructors is useful. I’m aware that there’s a performance penalty, but it should be fine as long as I spend minimal time processing in my code (the kernel handles running the guest VM, not my code).
What’s next
The registers are still seemingly useful and garbage at the same time, but we shall see. Next week will mostly be travel and continued refactoring while I try to learn more, so next week will be week 5 essentially.
Summarizing what happens above, we “emulate” serial output device, by printing out what the VM wants to be printed, onto the console.
Cool, it works. We’re ready to start porting this onto the RPI.
Wait, how do I work with a RPI PI Zero 2 W?
Device setup
I had just bought this device. So let’s see what we need.
Some way to work with the project.
Running and testing on the RPI.
To run the project, I thought the easiest way would be to cross-compiling. So let’s get cross-compiling setup in Fedora.
And checking on Google, there’s a gcc arm64 cross compiler package:
Well, that’s a no then. Its not possible to cross compile actual userspace executables for ARM64 on x64 machines.
Then, let’s run it on the PI itself.
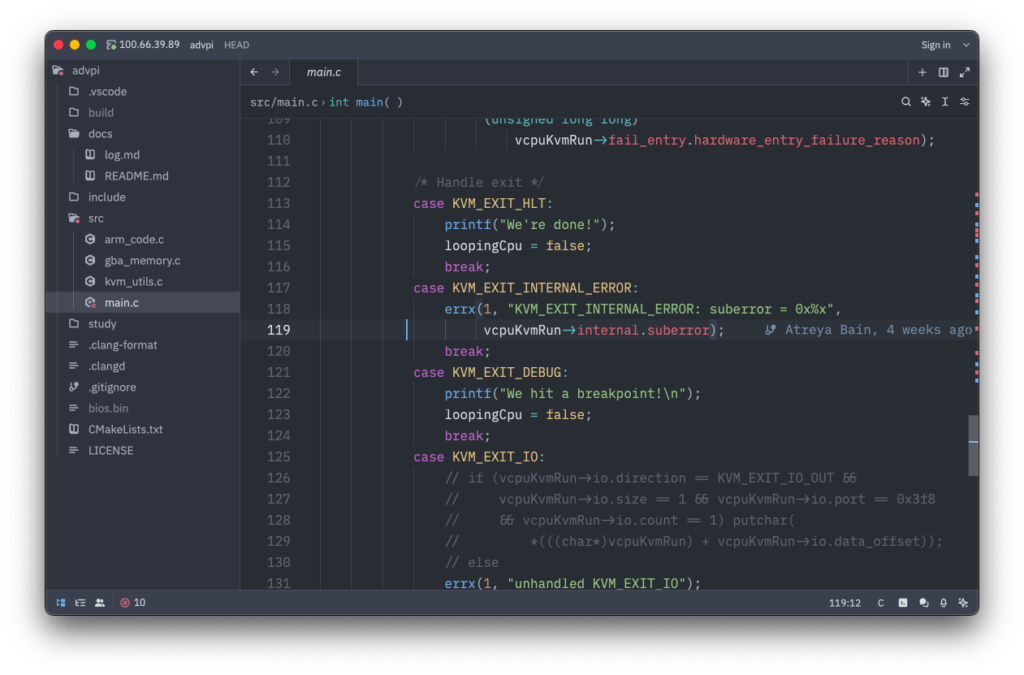
So, I decided that using some kind of remote development server is good. I tried VSCode, and the poor PI Zero 2 W collapsed given the weight of the remote server.
Well, then zed comes to the rescue. With a bit of tweaking, I connect to the PI over Tailscale, and open it using zed. Perfect.
I’m missing out on debugging, which will make it a pain, but that’s okay. Been through worse. Maybe it’ll finally push me to learn gdb.
Getting to run the Thing
Once that’s in and all things are done, we get to the first bit – compile errors all over the place. Some things are wrong.
Since the KVM API is different, the register names and the structures are different. Now it won’t compile.
KVM_GET_ALL_REGS and the corresponding don’t work. For some reason, its required to use KVM_SET_ONE_REG (and the corresponding individual get register).
Okay, all fixed.
There’s still a few things to fix. Namely, starting the CPU in 32 bit mode, and setting the initial PC and code.
Starting in 32 bit
The Cortex A53 starts in 64 bit as it is… a 64 bit processor. How do I instruct it to start in 32 bit mode? Rummaging through the KVM docs (Ctrl+F for “32-bit”), turns out before starting the CPU, I also need to initialize it with featuresets.
Why is it features[0]? I’m not sure I want to know why its addressed that way after spending way too much time trying to find out. The initialization also gives a bunch of useful features to initialize based on what’s required for us – I don’t want them as of now.
Now that the CPU is ready, something needs to be there to execute code.
Executable code
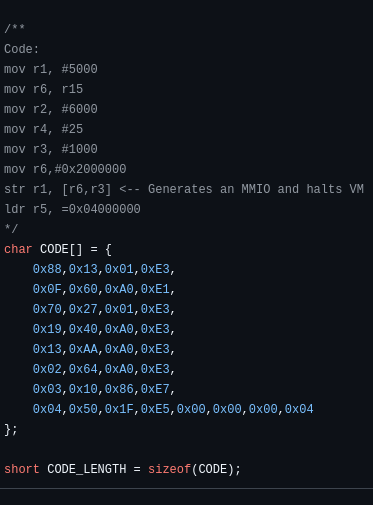
The days of writing code in assembly is gone (for the regular Software Engineer), but now, we need it again. Regular assemblers are too complex (for me as of now) to generate only the tiny snippets I need. This awesome online tool – “Online ARM to HEX Converter” does it all online. I put a small piece of code and let’s see what it does:
Wonderful – something. So I put this in an array and hope it works.
After all this, it still didn’t work (hint: endianness).
I got an MMIO, but was confused what it meant so I added this hideous snippet:
for (int r = 0; r < 16; r++){
  printf("Got Registers: %d(%ld)\n", r,
    getRegisterValue(gameboyKvmVM.vcpuFd, r));
}
We get this sad output and the program hangs; and I have no idea what’s going on:
So the registers were loaded correctly – and the code here was executed! But then R15 is 0? and the next LDR also didn’t generate an MMIO. Strange.
What’s next
As the week comes to a close, I’m getting a bit annoyed at managing resources, and would like (at least a bit of) help from the language. I’ve been coding in a “write the code then pray it works” – and have been ignoring cleanup, refactoring and reading the code again. Let’s take the time to do that, fix any issues. Hopefully by then I fix any faults in the program by cleaning up, or atleast learn more by then so I can.
I recently bought a Nintendo DS, and a Raspberry PI. Turns out the Nintendo DS can run Game Boy Advance (GBA) games, because they have the same CPU architecture.
NDS and a RPI Zero 2W
Well, the Raspberry PI isn’t too far off too. Does it mean I can just run Gameboy Advance Games on the RPI too?
Well, that’s what this series will go to show. This week is about understanding feasibility and what I will be using (and why). The later weeks should explore things in a bit more technical detail.
Can it GameBoy Advance?
Let’s see what we need, to run it on the Raspberry Pi Zero 2 W. I’ve chosen it because its very small, but runs the same chip as the RPi 1.
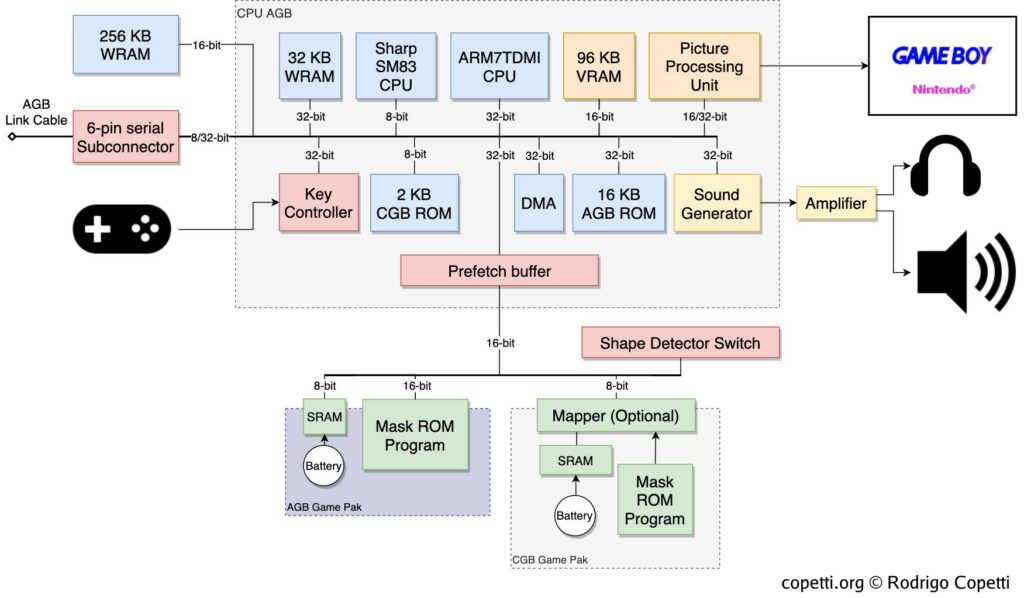
This beautiful article “Game Boy Advance Architecture” by Rodrigo Copetti explains what’s required for a GBA, but, let’s break it down and compare it to the RPI Zero 2 W.
Also, let’s think about the weird stuff like Display, Audio and Input later. Being able to run stuff is more important.
GBA Architecture – Rodrigo Copetti
So, let’s go by this order:
CPU
Memory
I/O
CPU
The Zero 2 W has CPU with 4 Cortex A53 cores, whereas the GBA used a ARM7TDMI chip. The A53 might be ancient, but the ARM7TDMI is comparatively prehistoric.
But, delving into the A53 Technical Reference Manual, it is entirely backwards compatible with the ARM7TDMI! The AArch32 instruction set, seems to be a renamed edition of what the older GBA CPU used to use.
Awesome, so the RPI CPU can natively run all these instructions, no problems.
Memory
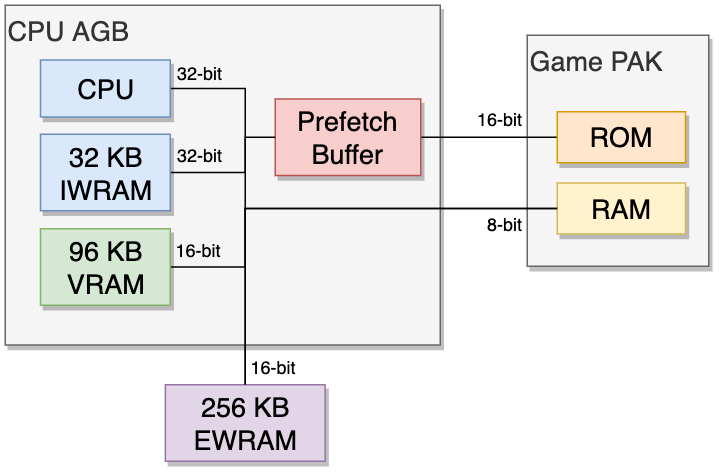
Memory – Rodrigo Copetti
Oof, it gets complicated here. There’s few things:
The AGB RAMs – They’re basically two different RAM chips, one smaller (32KB) and faster chip, and one larger (96KB) and slower chip.
The even slower (but massive) EWRAM
GamePAK memory – the Game Data
All of these items are laid out in the memory address space for the GBA CPU to access.
The GBA CPU accesses data through 32-bit addresses, and there’s a full address-layout map for fetching and storing data into these addresses.
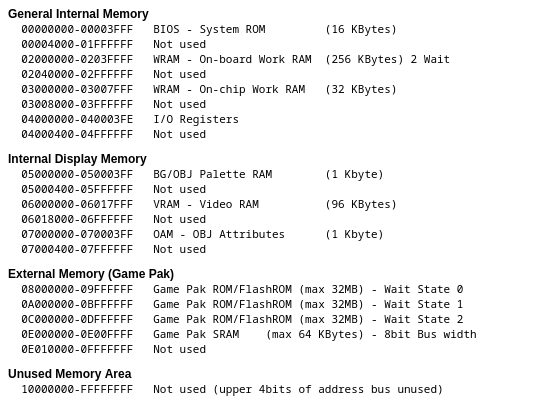
Here’s the memory map from the no$gba documentation. (Ignore the Display Memory and I/O registers for now)
Intuitively, what this means is when the CPU tries to load data from 0x2000000, it loads the first byte of data from On-board WRAM. If it tries to use 0x3000000, it takes the first byte of data from the On-Chip Work RAM.
The RPI, unfortunately, has none of these mappings. It does however, has 512MB of RAM, which completely runs circles around what the GBA has for memory. Perhaps if there’s a way to create or simulate these mappings for the CPU to use?
I/O
We ignored the Display and IO memory mapping then, so we can discuss about it now. The display and the I/O is all memory-mapped. This means the data is directly available and usable via the memory.
The RPI, again, has none of this I/O. But it does have a lot of GPIO pins and display capabilities already, perhaps it can be “massaged” into the right shape and plugged into the GBA memory layout?
The initial hypothesis – Virtualization
Well, we had three finding:
The GBA and RPI can both execute ARM code
They differ in IO.
They differ in memory mapping.
Well, in these cases, people usually use virtualization. Hmm… That seems awfully inefficient. I might as well use an existing emulator then, where it’ll also replicate the behaviour of the CPU. Although…
Hardware-Assisted Virtualization
Hardware assisted virtualization is a featureset of newer CPUs, where the CPUs can run guest code directly, skipping the need to emulate CPUs in software. Intel provides HAXM, AMD provides AMD-V, and ARM provides… well, something similar, but not sure what the name is. Let’s see how to use it in practi-
No, I can’t understand any of that. Understandable.
Looking online how it works, I remembered/found this neat thing – KVM. Linux takes all these features, and abstracts these architectures into one API, the KVM API. This allows Linux Hosts to run Guest machines with Hardware Accelerated execution.
KVM allows setting memory spaces, setting device specifications and runs code on a virtualized CPU that runs on the machine using the Virtualization Extensions on the CPU. Anything devices need virtualization? KVM gives control back to you to implement it yourself.
What’s better, the RPI Zero 2 W supports KVM.
$ ls /dev/kvm
crw-rw---- 1 root kvm 10, 232 Dec 7 19:29 /dev/kvm
The Final Problem Statement
So, let’s distill all of this into two questions:
Can the GBA be run as a virtual machine on the Raspberry PI Zero 2 W?
Is there any benefit to virtualization, instead of complete emulation?
Thus, the project advpi is planned to run GBA code on the PI Zero 2 W, by using a virtual machine.
The IO will need to be adapted and emulated by the software as well.
Display, can be showed on a window on-screen, and the sound can be played on the pi as it has sound capabilities as well (given a speaker is attached to it).
Anything else, will be figured out as it comes. Let’s see how that goes.
What’s next week?
Setting up a workspace on a RPI.
Testing the KVM API to run some x86 code, as it is well-documented.