Categories
Software

BytePusher – A Gentle Shove into Emulating

Emulators have always felt fascinating to me, and while trying to find ways to learn about them, I chanced upon BytePusher – an esolang by Javamannen. Let’s talk a bit about the Bytepusher emulator I built.

What’s Bytepusher?

tl;dr – Bytepusher is a specification for a single instruction set computer with a limited input, 2D graphics and audio.

It has one instruction, and runs like a champ.

Emulator firsts

Well, its a virtual machine to be honest, but I assume there’s enough in the specification to make it a complete phyiscal machine.

This was one of my first works in Rust, and it has a single thread system that processes the instruction, then goes to render the graphics and audio.

One of the trickier things is that the audio queue should be as small as possible, but yet can’t be empty. If empty, you have stutters, or otherwise, you have high latency. For now, I synchronise with the audio queue to maintain an expected speed of execution.

What does it look like?

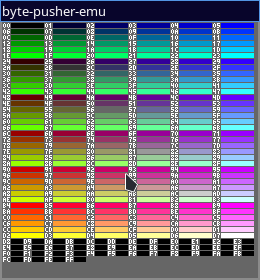
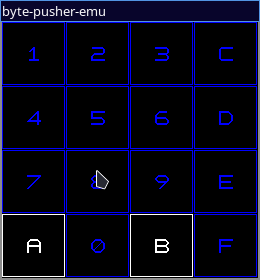
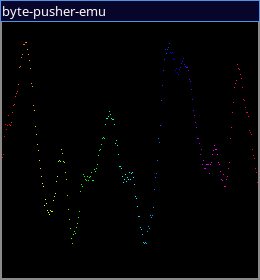
We get audio, input output and graphics!

Check out the work here! I apologise but I only have linux builds available, executables from the other platform can be built from source.

Categories
advpi

advpi – Week 6 – Code Execution

This week was hyper-focused on getting normal, proper code execution.

Code layout

The first thing to get right was the code execution.

I found this wonderful project kvm-arm32-on-arm64 that provided a style for doing this.

So, it turns out that ARM converter prints the code in the format its in memory. So, to write it correct, I used the big endian format and then stored it in code in the uint32_t format. This way, the compiler will set it to little endian format as required, and I don’t need to think about endianness for a while.

So if I take this bit of ARM code, that loops,

nop
nop
nop
mov r0,0x0
mov r1,0x1000
mov r2,0x1
add r3,r1,r2
str r3,[r1]
mov r15,0x2000000

We convert it to the following array.

uint32_t CODE[] = {
    0xE320F000,
    0xE320F000,
    0xE320F000,
    0xE3A00000,
    0xE3A01A01,
    0xE3A02001,
    0xE0813002,
    0xE5813000,
    0xE3A0F402,
};

I would expect it to exit from MMIO (as it attempts to write to a read only page) at 0x1000, and exit per the program. If it loops or does anything else, something is wrong.

Thankfully, we get this wonderful(ly confusing) output:

Hello, from advpi!
Opened bios
Attempted mmio
Attempted write=yes of value=4097 and at address=4096
Register(0)=0
Register(1)=0
Register(2)=0
Register(3)=0
Register(4)=0
Register(5)=0
Register(6)=0
Register(7)=0
Register(8)=0
Register(9)=0
Register(10)=0
Register(11)=0
Register(12)=0
Register(13)=0
Register(14)=0
Register(15)=0
Closing the Virtual Machine

So, the MMIO output was correct, but we’re not able to see the registers. I’m thinking it is more related to the exception levels and register banks that are available, but I shall check more on it as required.

So although technically we can’t see the registers, we can get some rudimentary output through MMIO, or shared memory.

If I remove the MMIO causing statement, we get an endless loop – showing that we’re stopping as required.

What’s next

This week was short as well. Following this, I’ll be setting up a GBA cart, and the video device. I’m thinking of using SDL2 to show a video device and handle device I/O.