Categories
Development HSQL

Week 12: Dedup & Documentation (& Examples)

This week focused on finishing up documentation, a little bit of cleanup and one final task of implementation that would be helpful.

DISTINCT

The SELECT DISTINCT clause currently uses a DEDUP(x,ALL), which is notoriously slow for large tasks. Instead an alternative clause was suggested

TABLE(x,{<cols>},<cols>,MERGE);

//eg. for a t1 table with c1 and c2
TABLE(t1,{t1},c1,c2,MERGE);

This looks good!

But, the question is – how to get the columns c1 and c2 for the table t1? It may not always be known, or worse, the known type information may not be complete. Here, we are presented with two ways in which we can proceed with this information:

  1. Stick with DEDUP all the time. It is slow, but it will work.
  2. Use the new TABLE format, falling back to the DEDUP variant if type information given is not sufficient.

This is great, and it also incentives typing out ECL declarations, but it still feels as a compromise.

Template Language

Everything changed when I realised that ECL has a wonderful templating language. For a quick idea on what the point of a template language is, it can be used in a way similar to the preprocessor directives in C – macros that can be used to write ECL.

So, what can we do here? The good thing about writing macros is that since they are based off the same solution, the macro processor can work with data types in ECL very well, and also, can make ECL code.

So, can we write an expression that creates the c1,c2 expression, given that the table t1 is given?

__dedupParser(la):= functionmacro
    #EXPORTXML(layoutelements,la);
    #declare(a)
    #set(a,'')
    #for(layoutelements)
        #for(field)
            #append(a,',');
            #append(a,%'{@label}'%);
            #end
        return %'a'%;
    #end
endmacro

Although I won’t go into the details of this interesting function macro (A macro whose contents are scoped), in essence, it can take a record, and put out a snippet of code that contains the columns delimited by comma.

Using __dedupParser

Although the naming isn’t accurate, we can inspect what the macro does by an example

Given a record R1, which contains two fields, f1 and f2 (Assume both as integer), then __dedupparser(r1) will create an ECL code snippet of “f1,f2,” (Notice the trailing comma). This works nicely with the RECORDOF declaration, which can help get the record associated with a recordset definition.

So, this brings something really useful, as we can now have this general code syntax –

TABLE(<t1>,{ <t1> }#expand(__dedupParser(RECORDOF( <t1> ))),MERGE);

This simple expression generalizes the entire TABLE function pretty effectively.

Adding this into code, it is important to remember that the function macro needs to be inserted separately, and most importantly, only once in a ECL file. This is better done by tracking whether a DISTINCT clause has been used in the program (Using an action like we had done earlier), and inserting the functionmacro definition at the top in this case. And with this, a good new improvement can be made to the SELECT’s DISTINCT clause.

Distinct now has shinier code!

This should perform much better, and work more efficiently.

Documentation

So far, some of the syntax was stored and referred personally by the use of notes, memory and grammar. Writing this down in essential as a way of keeping a record (More for others, and even more importantly, for yourself). So, keeping a document to denote the syntax available to the user is rather important.
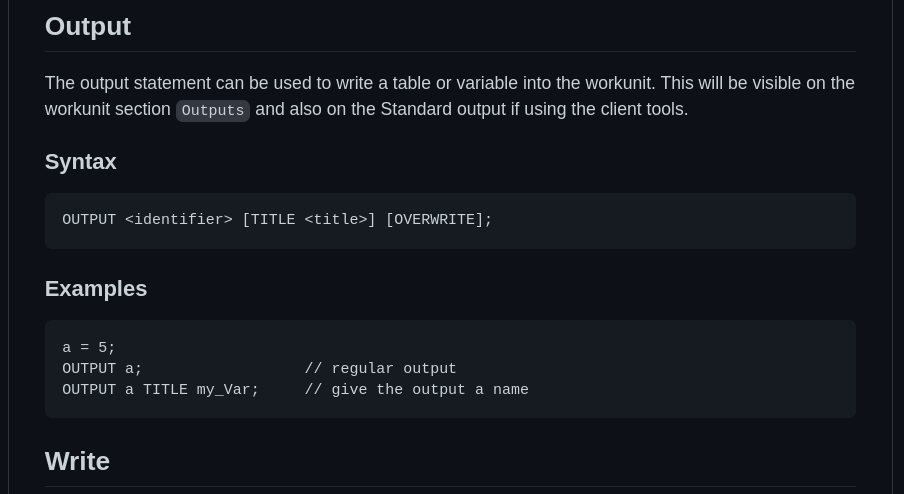
Docs for OUTPUT!

Here, its important to lay out the syntax, but also present some usable examples that an explain what is going on with that code segment. (Yeap, for every single statement!)

Winding up!

With documentation, that ends a lot of the work that was there. In fact, its already Week 12, although it is still surprising how quickly time has passed during this period. My code thankfully doesn’t need extensive submission procedures as I was working on the dev branch, and work will continue on this “foundation”. It has been a wonderful 12 weeks of a learning and working process for me, and I would like to thank everybody at the HPCC Systems team for making it such an enjoyable process! Although this is all for now, I can only hope that there’s more to come!
Categories
Development HSQL

Week 11: Machine Learning Methods and Final Presentation

This week, was adding some more Machine Learning Methods, and a final Presentation for the work I’ve done through this period!

Adding More Machine Learning Support

A set of other

A set of other training methods were also added. GLM was decided to be split into some of its more commonly used components. This expands the support to also include:

  1. (Regression) Random Forest
  2. Binomial Logistic Regression
  3. GLM
  4. DBScan
More model types!

This, is rather easy to do now that we have added declarations; there is a standard ML_Core.dhsql memory file, and this provides a nice way to provide built-in declarations.

Going from here, following the declaration syntax, we can add in a lot of the methods:

Here is a declaration for Classification forest

Predict-only methods

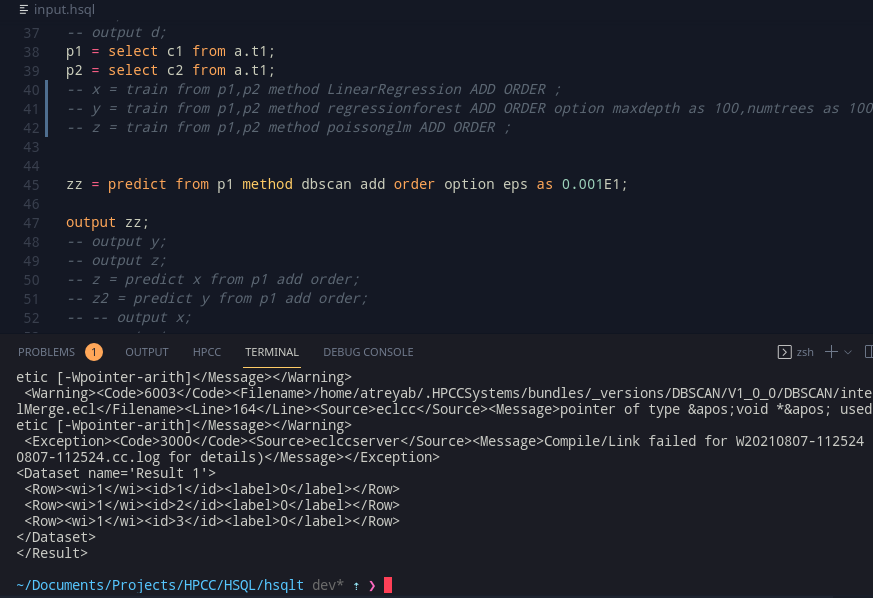
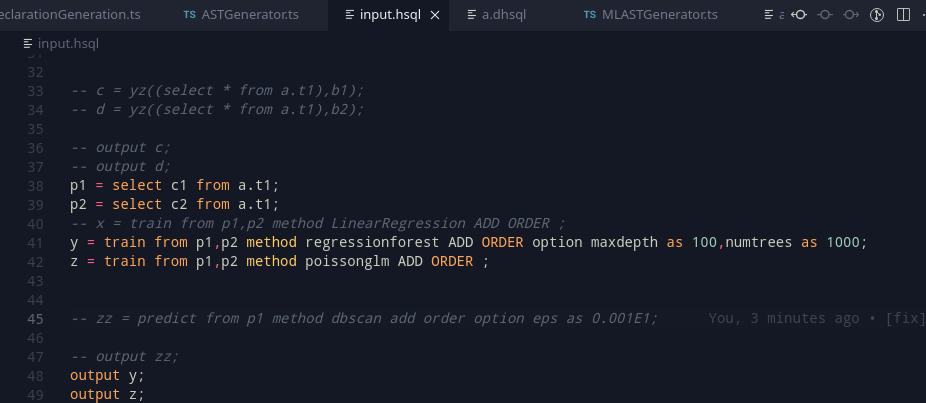
DBScan is a good one, as it is an unsupervised Machine Learning technique that does not fit into the traditional ‘train-predict’ idealogy. Here, the idea is have a variant of the predict statement that captures a syntax similar to train. Let’s model the statement as:

predict from <ind> method <methodtype> [ADD ORDER] [<trainoptions>];

Adding in the grammar, as most of the work is similar to train, we can add this in, and voila! A new statement for this form of machine learning!

DBScan!

Final Presentation

This is where a lot of the time was spent; I’ve been gathering and making examples for HSQL, and how it can be used, and on Thursday, we had a presentation on HSQL, what’s new and how it can be useful! (I will post more about it when I can!)

Wrapping up

As week 11 comes to an end, there are some things that may require documentation, and those are being looked at; and that’s about it! We still have to add some examples for the easy to use machine learning statements, and maybe also look at some code generation suggestions. (and perhaps even try to implement one!)

Categories
Development HSQL

Week 10: Train and Predict

This week’s focus was more on getting train and predict working, the last two remaining statements. There were also some minor bugfixes.

Declarations

Declarations are used on the .dhsql files that we’ve worked on in the past. They’re a really nice candidate for adding in a way for bundles to indicate their train methods. However this time around; the ML_Core bundle is auto-loaded on import, but the actual machine learning methods are separated into many different bundles. Let’s see what’s need to actually make the machine learning statement work-

  1. The training template
  2. The prediction template
  3. The return type of the train statement
  4. The return type of the predict option
  5. Is discretization required?
  6. The model name (When predicting)
  7. The additional options that may be passed to train
  8. Are there any other imports?

So that’s 7 things that’s required. We can wrap it up into a whole declaration statement that the user need not worry about, but just expressive enough to list these.

From here, let’s take an example for LinearRegression to go about it.

declare linearregression as train '{bundleLoc}{ecldot}OLS({indep},{dep}).getModel' REAL RETURN TABLE(int wi,int id,int number,real value ) WHERE '{bundleLoc}{ecldot}OLS().predict({indep},{model})' RETURN TABLE(int wi,int id,int number,real value ) by LinearRegression;

That’s a lot but what does it mean?

  1. LinearRegression is an available training method.
  2. It uses {bundleLoc}{ecldot}OLS({indep},{dep}).getModel as a template to train. The appropriate code gets filled in as required. (Yes, the ecldot becomes a ., this is just to help with in-module methods, which may be a thing later but not right now).
  3. REAL – it does not require discretization.
  4. RETURN TABLE(int wi,int id,int number,real value ) – The model is shaped this a table. It can also just be RETURN ANYTABLE if the shape is too annoying to list out or not required.
  5. WHERE – switch over to the details for the prediction part
  6. '{bundleLoc}{ecldot}OLS().predict({indep},{model})' – This is the template to predict with
  7. RETURN TABLE(int wi,int id,int number,real value ) – The final result looks like this!
  8. The method needs an import of LinearRegression to work.

Why are there two ‘return’s? That is because the model is not going to look like the prediction, and often, many machine learning methods give different shaped predictions (E.g. Logistic Regression returns a confidence too along with the result).

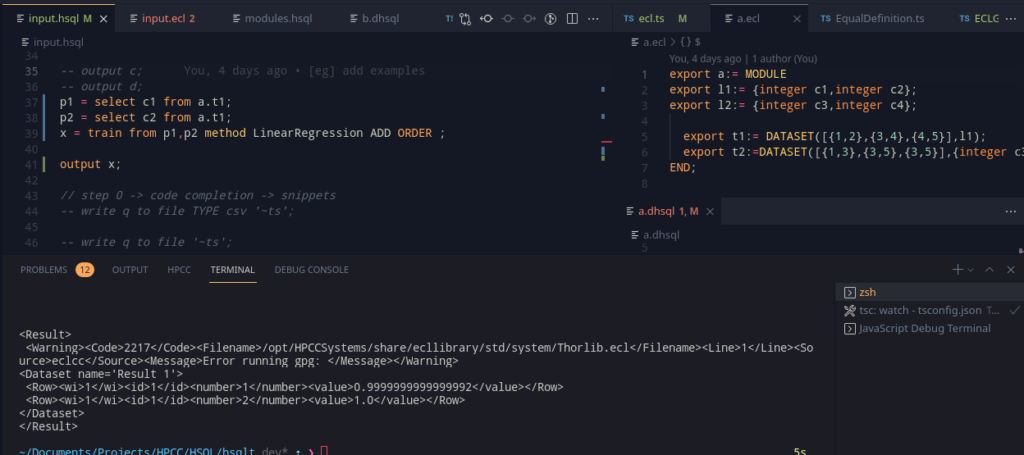
Adding these in, we get some good news of it working (Debugging is a god-send in Javascript programs, and VSCode’s JS Debug Terminal really makes it so much easier!). No outputs and screenshots yet though, there’s still some work left.

Tag Store

This is a good time to remember that there should be a way to tag variables in the variable table so that some information can be drawn out of them. Why is that useful?

Well, let’s take an example

  1. Easily find out which layout the table originated from.
  2. Tag a model (which is basically a table), as made with an ‘xyz’ method (eg. by LinearRegression)

This is actually easy. We can write up a simple Map wrapper and provide a way to pull out strings, numbers and booleans:

private map: Map<string, string | number | boolean>;
constructor() {
    this.map = new Map();
}
getNum(key: string): number | undefined {
    const entry = this.map.get(key);
    if (typeof entry === 'number') {  // only return numbers
        return entry;
    } else {  // dont return non-numbers
        return undefined;
    }
}

We can extend this for the other types also! Now to keep a track of the keys, we can have a nice static member in the class:

static trainStore = 'trainmethod' as const;

Instead of having to remember the string, we can use this static const variable as well. We could also implement a whole type system and only allow specific keys, but that’s way too complex for a simple key value store.

Adding this as an element for our base data type DataType, we can now have a small k-v pair set for the variable tables. Note that here, WeakMaps were also a good way of doing this, but I do not wish to worry about equality of data types yet.

Train

Baby steps, and we are getting to Train. Passing the required arguments into train, the general way of generating the AST for the train node goes like –

  1. Find the train method. If it doesn’t exist, its time to throw an error.
  2. Check if the independent and dependent variables exist, and if they do, warn if they’re not tables. (Throw a huge error if they don’t exist to begin with.)
  3. Now, check the train arguments/options. Map the argument names with the datatypes and if the user has supplied them. If there has been a repeat passing of the same argument (name), or that given argument does not exist, throw an error.
  4. Dump all this information into the node, and done!

Doing all this, the code generation steps become easy! Just stack the variables (Similar to SELECT, discretize and add sequential ids if required, and fill it into the code template), and we have train!

Three days of effort and I can finally say that 2 = 1*1+1! (/s)

Predict

Predict follows a similar pattern – find the method, check if the arguments to it are tables, and then proceed to fill in the templates and the required steps using the stacking method from SELECT. Not going into a lot of detail as its the same, but here’s another thing.

We can use the tag store, and find the original model type, and this makes mentioning the model type optional. This allows for this nice pretty syntax!

Train, Predict, and code generation!

Of course, If you are keen enough, I have used incompatible train and predict templates (Classification and Regression Forest). This was just a way to check that by mistake, the same template wasn’t being used. This was fixed, and we now have LinearRegression, and Classification Forest as well! (2/?? done!)

Offset

I realised there was still something in SELECT that needs to be worked on – loading data from logical files.

The syntax currently looks like this

SELECT * from '~file.csv' TYPE CSV layout l1;

Now, in ECL, a common pattern is to use

DATASET('~file.csv',l1,CSV(HEADING(1)));

This removes the header part. The best way, for us is to use the offset clause. But, currently, it is only allowed a suffix to the limit clause. To deal with this, we can make this both optional.

However, the code generation stays almost the same, except for if only offset is specified. In such a case, we can fall back to using a array subscript method.

For example, offset 1, can translate to [1..]. This works well, and gives us a nice output!

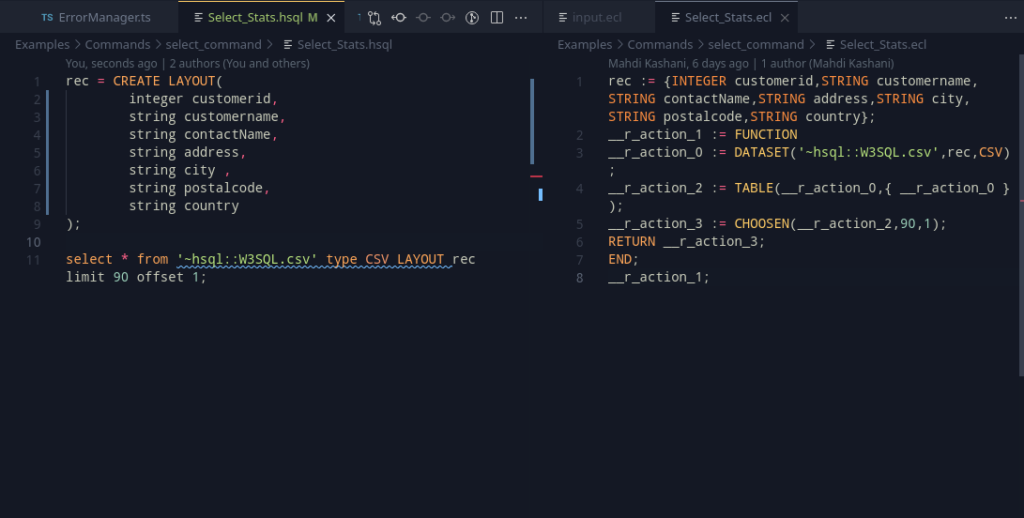
Can you spot a mistake in the offset code?

There’s one small issue though. ECL arrays are 1-indexed. In this case, its trivial too, we can just add a 1, and it’ll work perfectly.

offset 1 hence, should actually become [2..].

Winding up

This completes this week 10 too, and we’re almost there! Now, we can move towards week 11, with the following plans –

  1. Prepare for the final presentation next week
  2. Add more training methods!
  3. Maybe look around and find some nice ways to show the documentation and information about this project. Typedoc is already present in the project, but perhaps Docusaurus or Gitbooks would be good to use!
Categories
Development HSQL

Week 9: Lots of things!

This week has been a big week – extending SELECT to load up datasets from logical files, modules, functions, and running from a CLI was worked on. There’s a lot to uncover!

Select from dataset

As layouts have now been introduced, one handy way of using select can be added in – loading up a dataset. The idea behind it is similar to how join works in HSQL – a new aliased variable that contains the necessary table. The shape of the table may be made out from the layout that was supplied to the command. Consider the following example:

Select * from '~file::file.thor' layout l1;

This above example selects from the logical file using the layout l1. To see how this would translate to ECL, we can take the following example as what we want to achieve –

__r__action_x :=FUNCTION
  src1 := DATASET('~file::file.thor',l1,THOR);
  res := TABLE(src1,{src1});
  return res;
END;
__r__action_x; // this is the end result-> assign it if needed

Taking a look at SELECT, we can add support for ECL’s 4 supported types – XML, JSON, CSV, THOR. THOR is relatively easy to work with, but CSV files very commonly need to have their headers stripped (CSV(HEADING(1)) more precisely, when writing the ECL Code). This, might be a good point for SELECT’s offset clause to fit in. Currently it can only work with limit, but that restriction can be lifted later (by falling back to array subscripting).

Adding this SELECT Dataset as a separate node for the AST, we can treat it just like a join, and voila!

We can select from a dataset!

Modules

Modules are a great way to represent and structure code. Thankfully, as we’ve worked with select, the modelling style is similar here. The variable table entry for modules already exist, so its just a matter of adding in the right syntax. A good one to start would be

x = create module(
  export k = 65;
  shared j = 66;
  l = 67;
);

Currently the grammar still includes ECL’s three visibility modes, but we will look at that later.

When creating an AST node, we can create a new scope, and put our new variables in to create the module before popping them off to create the module entry; and while I thought this was easier, this was more of a “easier said than done”. However, thankfully, it didn’t take much longer since as I had mentioned, the data types were already in place.

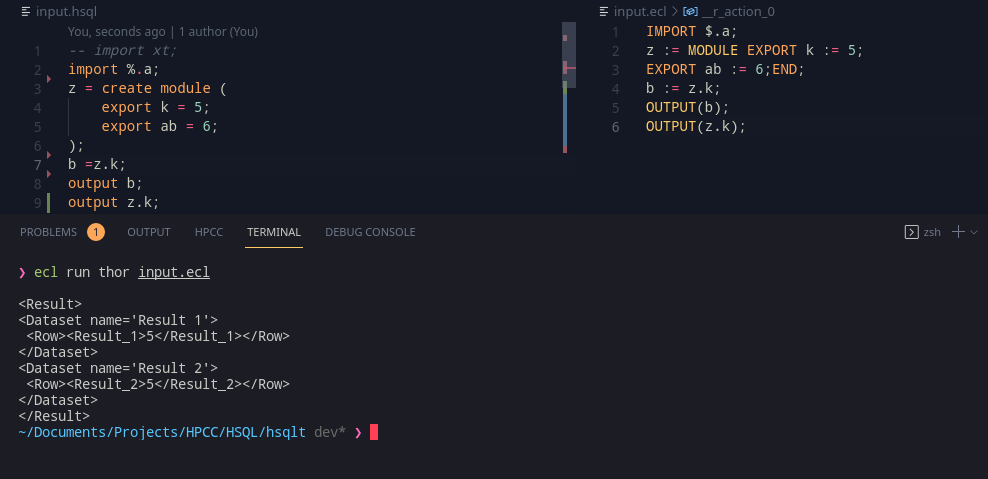
And… modules!

The variable table (or symbol table in regular compiler literature) can already resolve by the dot notation, so the type checking it works seamlessly and translates identically without any problems to ECL.

Functions

Functions are intended to be a nice way to reuse code. Implementation wise, they look pretty intimidating. How to start?

Well, let’s start at the grammar

create function <name> ([args]){
  [body];
  return <definition>;
};

This is something to start with; it looks simple to work with and implement for the grammar. Going into the specifics, we can look at the arguments – there can be two types – the usual default primitive arguments, and a table. For the former, the standard C type rules work, for layouts, we can define them somewhat like this example:

create function yz(layout l1 x,int y){
  //...
};

So, an important thing here, is to actually resolve this layout. Once we realise the layout, we can work with AST generation for the function in a way similar to that of the select statement – we can push a new scope into the function, and thankfully, as ECL supports variable shadowing for functions, we can push in the arguments as variables into the scope. Once that is over, we can pop the scope, and the resultant variables are gone! The arguments and the result type needs to be stored by the datatype though, and a function needs to be represented in the variable table too.

Adding all this in, only does half the job. Now that there’s functions, there needs to be a way to call them.

Function call

Function calls are rather important to be able to execute them. Now, the easiest is to model it after most of the programming languages:

x = somefunction(y,z);

This function call can be checked during the AST Generation steps by the following steps:

  1. Locate the function from the variable table. If it cannot be found, throw an error.
  2. Match the function arguments. Does the length and the types match? If no, throw (lots of) errors.
  3. The function call node evaluates to the return type of the function now.

From here, the assignment node takes care of the returned type from there.

Adding all these steps, we can get something marvelous –

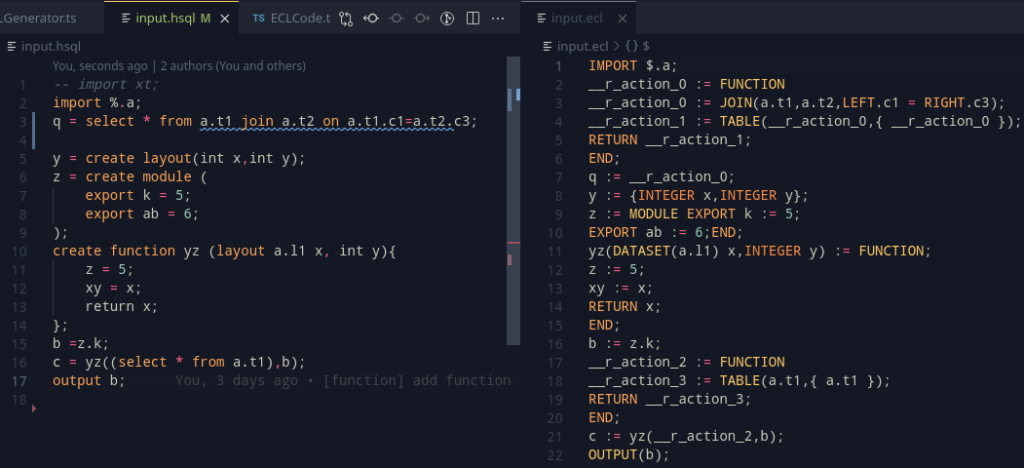
Functions and Function calls! Finally (The example also shows passing a select statements results into the first argument)

Running

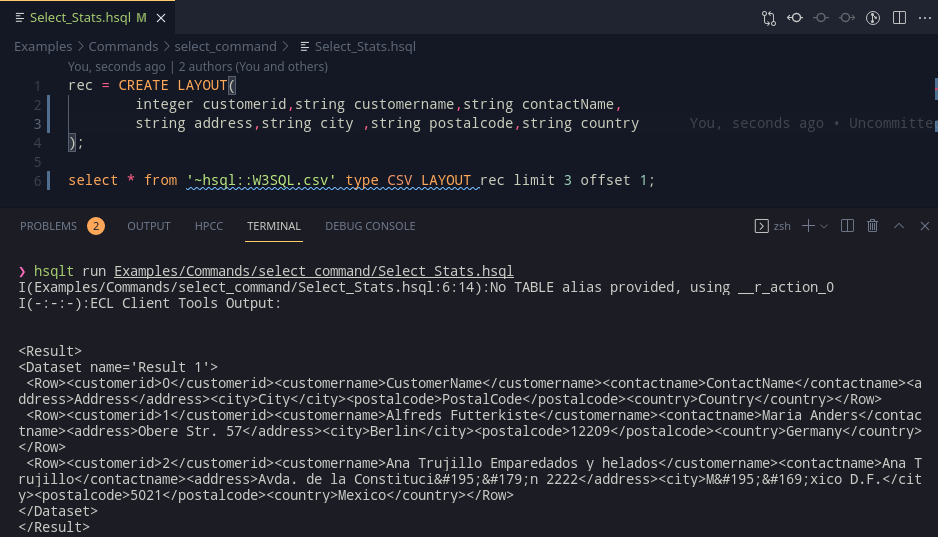
HSQLT already consults eclcc for getting the paths; this is a good opportunity to use this functionality to extend this and use ecl to compile and submit the resultant .ecl program. After checking if the outputs were produced from the previous code generation stage onto the filesystem, we can take the mainfile which stores the entry point for parsing, and submit that file’s ecl program to the cluster using the client tools. Using some nice stream processing, we can project the stdout and stderr of the child ecl process and get this nice result:

An easy way to run the programs now!

And there’s still more to go. Going over to the extension:

Code completion – Snippets

Snippets are an easy way to work with programs. VSCode snippets are a first step towards code completion. The example below can be typed with a simple write and the line will be filled in. Using TAB, the statement can be navigated and the appropriate sections can be filled in.

Write Snippets

Code completion – Variable Resolving

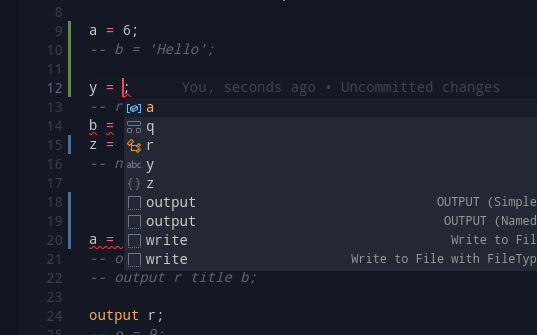
Variable resolving can be combined with Snippets to allow the user to write programd faster and more effectively. Pressing Ctl+Space currently brings up the current program’s table for auto complete. This, can be added by storing the last compilation’s variable table, and using that to find the possible variable entries.

We can see the variables!

Wrapping up

Oh dear, that was a lot of things in one week. The plans for the next week can roughly be summed up as –

  1. Look into implementing TRAIN and PREDICT statements for Machine Learning.
  2. Look into code generation, fix any glaring issues that result in incorrect code generation.